Paper Flowers
How You Can Make Paper Flowers at Home without a Cricut
Hey ya'll! It's Jessica from This - N - That Furniture & Crafts and I'm going to show you how you can make a bold statement or subtle one if you prefer with simple paper flowers with just a few simple supplies!
Paper flowers can give you a jaw dropping look in any room. The best part of it all is how incredibly easy they are to make. You can make them as big or as little as you want and in any color imaginable! They are perfect for classrooms and nurseries and even make great decor for baby showers or even in bedrooms.


I recently helped my daughter who teaches at a local daycare make some of these flowers to go on her classroom wall, and I have to tell you that it was not only easy but absolutely fun! Best of all you don't need a huge budget, just a few simple materials and you can bring a pop of color into any decor. Cute isn't it?


Okay! Lets talk paper! Your going to need around 20 sheets of paper for each large flower. We simply used construction paper for our flowers because it is something that will be changed out based on that month's particular lesson or theme. You will notice that after adding each layer of the petals the flower itself will become sturdier with each addition but feel free to use some good card stock if your wanting to minimize the number of petals or want it to stand up over a longer period of time.
Here's a quick tip if your wanting to save on paper. Cut as many petals as possible out of one sheet of paper to cut back on waste and have some sheets for another project.
Supplies Needed for Your Paper Flowers
- Petal and center template found here form the Craftpatchblog We did a variety of flowers and all the templates we used can be found at the above link
- Construction paper or card stock in any color roughly 20 sheets per flower
- Hot Glue Gun (you can use regular glue just know that it will take much longer to set due to drying time
- Glue sticks
- Scissors
- Any embellishments you may want to add to your flower - have fun and make it your own
Lets get started!
Begin by taking your printed template and tracing out the petals onto your desired choice of paper. Try to get as many petals on a single page as possible to minimize waste.
Next cut out your petals and circles. I try to cut them all out before moving on so I don't have to stop assembling and go back to cutting. It tends to make the project move along faster.
If your doing a large flower it will include the following:
- Small - 8 Petals
- Medium - 8 Petals
- Large - 5-7 Petals
- X-Large - 8 Petals
For a medium size flower you can skip the X-Large Petals

Getting the "flower" affect
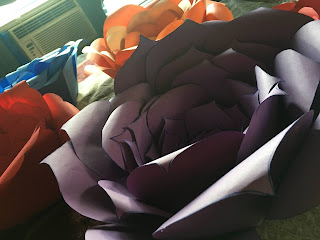
Take a wooden dowel or pencil and curl the ends of the petal to give it that realistic look.
At the bottom of each petal on the medium and large petals cut a slit in the center about 2 inches deep. This allows for bending of the petals while assembling without tearing them.
Add a drop of hot glue to one side of the cut slit and overlap them and hold until the glue dries or cools.
The medium and large petals will have a curved appearance and the previous curling you did should be facing backwards.
Gluing your petals together can be done two ways. You can use a t-shape fashion or you can glue two of the small petals together then start adding to form a circle. Once you start moving on the bigger petals I just place my petal where I would like it and glue in place as I go. This step make sit easier for me to fill out the shape of the flower as I go.
When all your petals have been glued on, you will take the circle and glue it on the bottom of the flower to finish off the flower. Some people have used a wired cake plate on the back to make it easier to hang but in our case we stapled our flowers to a bulletin board and it worked for what it was intended for.
You also hang your flowers with command hooks if this is something that will come down and you don't want to wreck your walls.
I hope you have fun creating your flowers! Get as creative and fancy as you want! Don't forget to follow This - N - That Furniture & Crafts to see all our woodworking and refurbishing projects!
Leave a comment and let me know what you think!


Comments
Post a Comment